Shaking a UIView
12/7/2014
In the last few days I haven’t been writing much, but I have been spending a lot of time working on CodeCalendar.
Instead of updating my progress in this post, I’m going to do something different by teaching one of the features I recently implemented in my app. Today I’m going to show you how to implement a shake animation to demonstrate a negative response to user input for iOS 8 (also works for iOS 7 and iOS 6).
I’m going to assume you know about UIViews, their frames, adding subviews and have heard of blocks.
Also, bear with me if anything isn’t clear, it’s my first time teaching something like this.
First, some background on my work so far:
I have a UIPickerView on a view that pops up after the user ends a coding session.
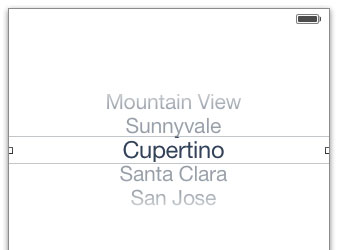
The issue with UIPickerView is that the delegate method
(void)pickerView:(UIPickerView *)pickerView didSelectRow:(NSInteger)row inComponent:(NSInteger)component
responds only when the picker has been moved. Using the above picture, that means if the city that the user wants to select is Cupertino, the user won’t think it necessary to move picker because it’s already selected. The user will think, “Oh, it’s already selected. I’m just going to continue to the next part of the app”.
In this example, if the picker does not move, nothing will be sent to the delegate method. The solution I found around this is just to insert a generic “Choose from below” option into the UIPickerView. That way, the first option the user sees isn’t what the user wants, and will be forced to rotate the picker.
However, what should we do in the instance that the user accidentally has the generic “Choose from below” row selected when the user continues on to the next prompt?
One way to do this is just to disable the “Next” button when the user has the “Choose from below” row selected.
Another way I found more interesting is to introduce a shaking animation of the prompt window to tell the user of a bad input. This is what OSX is known for when entering an incorrect password during a login screen.
Here is my implementation of the shake animation:
I know it’s difficult to see this on the simulator since I was recording at 30 fps, but it looks really nice when testing on an actual device.
What’s happening in this demonstration is that when the user has the “Select a language” row selected, pressing the “Done” button will shake the UIView and not allow the user to proceed to the next prompt. As you can see later in the gif, when the user has selected a valid row, the app will allow the user to move on.
Now to the part of the post you’ve been reading for, here’s my implementation:
// Class extension
@property (nonatomic) CGRect defaultFrame;

------


- (void)viewDidLoad
{
    	// Configuring the default frame. This is the frame of your view before the shake animation
        CGFloat midpoint = ([UIScreen mainScreen].bounds.size.height / 2.0) - 150.0f;
        self.defaultFrame = CGRectMake(0.0f, midpoint, [UIScreen mainScreen].bounds.size.width, 325.0f);

    	UIView *viewToShake = [[UIView alloc] initWithFrame:self.defaultFrame];

        [self.view addSubview:viewToShake];

        [self animateShake:viewToShake];
}

- (void)animateShake:(UIView *)viewToShake

{
      float duration = 0.06;
      float offset = 5.0;
      float repeatCount = 3.0;

      CGRect shakeFrameRight = CGRectMake(self.defaultFrame.origin.x + offset, self.defaultFrame.origin.y, self.defaultFrame.size.width, self.defaultFrame.size.height);
      CGRect shakeFrameLeft = CGRectMake(self.defaultFrame.origin.x - offset, self.defaultFrame.origin.y, self.defaultFrame.size.width, self.defaultFrame.size.height);

      viewToShake.frame = shakeFrameRight;

      [UIView animateKeyframesWithDuration:duration delay:0.0 options:UIViewKeyframeAnimationOptionRepeat | UIViewAnimationOptionCurveEaseInOut animations:^{

          [UIView setAnimationRepeatCount:repeatCount];

          [UIView addKeyframeWithRelativeStartTime:0.0 relativeDuration:0.5 animations:^{
              viewToShake.frame = shakeFrameLeft;
          }];

          [UIView addKeyframeWithRelativeStartTime:0.5 relativeDuration:0.5 animations:^{
              viewToShake.frame = shakeFrameRight;
          }];

      }completion:^(BOOL finished) {
          viewToShake.frame = self.defaultFrame;
      }];
}
If you’re not familiar with UIView animations, I would first suggest reading this tutorial. Basically, UIView animations are a very easy way to animate the following properties of a UIView from one value to another:
- Frame
- Bounds
- Center
- Transform
- Alpha
- Background Color
- contentStretch
We’re only going to worry about animating the frame of our view in this example.
In viewDidLoad,
- (void)viewDidLoad
{
	CGFloat midpoint = ([UIScreen mainScreen].bounds.size.height / 2.0) - 150.0f;

	self.defaultFrame = CGRectMake(0.0f, midpoint, [UIScreen mainScreen].bounds.size.width, 325.0f);

	UIView *viewToShake = [[UIView alloc] initWithFrame:self.defaultFrame];
	[self.view addSubview: viewToShake];

	[self animateShake:viewToShake];
 }
I define the defaultFrame of our view. I chose an origin.x of the frame to be 0.0, the origin.y to be the midpoint of the screen of our device, offset by 150.0 points toward the top of the screen. The width of the frame is going to span the width of the screen of our device, and the height of the frame is going to be a preset value that I determined (325.0 points).
I instantiate a new UIView with the defaultFrame I just defined, and add it as a subview to self.view. Next I call the animateShake: method.
What we’re going to be doing in a nutshell is animating the frame of the viewToShake by moving it slightly to the right (5 pixel equivalents) from the defaultFrame, and then animating it slightly to the left (5 pixel equivalents) from the defaultFrame. We’re going to be doing this very fast.
We do this by first defining a new frame that is slightly offset to the right of the defaultFrame.
- (void)animateShake:(UIView *)viewToShake
{
	float offset = 5.0;

	CGRect shakeFrameRight = CGRectMake(self.defaultFrame.origin.x + offset, self.defaultFrame.origin.y, self.defaultFrame.size.width, self.defaultFrame.size.height);
}
shakeFrameRight has the same frame as the defaultFrame, except that the origin.x of the frame is increased by offset = 5.0. This means that a small part of our shakeFrameRight is going to be off screen to the right.
Next, we do the same thing by defining shakeFrameLeft
- (void)animateShake:(UIView *)viewToShake
{
	float offset = 5.0;

	CGRect shakeFrameRight = CGRectMake(self.defaultFrame.origin.x + offset, self.defaultFrame.origin.y, self.defaultFrame.size.width, self.defaultFrame.size.height);
	CGRect shakeFrameLeft = CGRectMake(self.defaultFrame.origin.x - offset, self.defaultFrame.origin.y, self.defaultFrame.size.width, self.defaultFrame.size.height);
}
This time, instead of adding the offset to the origin.x of the frame, we subtract it, since in the iOS view coordinate system, subtracting from the origin.x moves left in the view and adding to the origin.x moves right.
Before we start animating, we set the frame of our viewToShake to shakeFrameRight:
- (void)animateShake:(UIView *)viewToShake
{
	float offset = 5.0;

	CGRect shakeFrameRight = CGRectMake(self.defaultFrame.origin.x + offset, self.defaultFrame.origin.y, self.defaultFrame.size.width, self.defaultFrame.size.height);
	CGRect shakeFrameLeft = CGRectMake(self.defaultFrame.origin.x - offset, self.defaultFrame.origin.y, self.defaultFrame.size.width, self.defaultFrame.size.height);

	viewToShake.frame = shakeFrameRight;
}
This will set us up to animate between the two frames we defined earlier.
Now that we have the two frames that we’ll be animating between, let’s dive into the animation method. This is going to look a lot more intimidating than it really is, but don’t worry, I’m going to describe every part of this code.
[UIView animateKeyframesWithDuration:duration delay:0.0 options:UIViewKeyframeAnimationOptionRepeat | UIViewAnimationOptionCurveEaseInOut animations:^{

          [UIView setAnimationRepeatCount:repeatCount];

          [UIView addKeyframeWithRelativeStartTime:0.0 relativeDuration:0.5 animations:^{
              viewToShake.frame = shakeFrameLeft;
          }];

          [UIView addKeyframeWithRelativeStartTime:0.5 relativeDuration:0.5 animations:^{
              viewToShake.frame = shakeFrameRight;
          }];

}completion:^(BOOL finished) {
	viewToShake.frame = self.defaultFrame;
}];
}
Now let’s check out the details of the method above. First, the method documentation:
The UIView class contains the methods that animate views for you. These are (+) class methods. The specific class method we’re using is:
+(void)animateKeyframesWithDuration:(NSTimeInterval)duration
                               delay:(NSTimeInterval)delay
                             options:(UIViewKeyframeAnimationOptions)options
                          animations:(void (^)(void))animations
                          completion:(void (^)(BOOL finished))completion
To call this method, we want to type:
    [UIView animateKeyframesWithDuration: delay: options: animations:^{

	} completion:^(BOOL finished)completion {

	}];
You can let Xcode autocomplete this method for you.
The first parameter of our method is the duration of length we want for our animation in seconds. I played around a lot with the time to see what looked good and I came up with 0.06 seconds. This means one left to right shake and back will take less than a tenth of a second. You can play around with your own duration time to see what looks good to you.
- (void)animateShake:(UIView *)viewToShake
{
	float offset = 5.0;
	float duration = 0.06;

	CGRect shakeFrameRight = CGRectMake(self.defaultFrame.origin.x + offset, self.defaultFrame.origin.y, self.defaultFrame.size.width, self.defaultFrame.size.height);
	CGRect shakeFrameLeft = CGRectMake(self.defaultFrame.origin.x - offset, self.defaultFrame.origin.y, self.defaultFrame.size.width, self.defaultFrame.size.height);

	viewToShake.frame = shakeFrameRight;

	[UIView animateKeyframesWithDuration:duration delay: options: animations:^{

	} completion:^(BOOL finished)completion {

	}];
}
The next parameter is delay:, which is the length of time in seconds between when the method is called and when you want your animation to start. We’re going to set this to 0.0 since we want the animation to start right when this method is called.
- (void)animateShake:(UIView *)viewToShake
{
	float offset = 5.0;
	float duration = 0.06;

	CGRect shakeFrameRight = CGRectMake(self.defaultFrame.origin.x + offset, self.defaultFrame.origin.y, self.defaultFrame.size.width, self.defaultFrame.size.height);
	CGRect shakeFrameLeft = CGRectMake(self.defaultFrame.origin.x - offset, self.defaultFrame.origin.y, self.defaultFrame.size.width, self.defaultFrame.size.height);

	viewToShake.frame = shakeFrameRight;

	[UIView animateKeyframesWithDuration:duration delay:0.0 options: animations:^{

	} completion:^(BOOL finished)completion {

	}];
}
The next parameter is options:, which is a number of options we can add to our animation. The list is pretty extensive, but we only need two of them for this example:
UIViewKeyframeAnimationOptionRepeat and UIViewAnimationOptionCurveEaseInOut
-
UIViewKeyFrameAnimationOptionRepeat just repeats the animation indefinitely unless you specify an animation repeat count.
-
UIViewAnimationOptionCurveEaseInOut has an acceleration curve for the animation, meaning the animation begins slowly, then speeds up in the middle, then slows down again toward the end of the animation. We use it here to smooth out our shake animation.
- (void)animateShake:(UIView *)viewToShake
{
	float offset = 5.0;
	float duration = 0.06;

	CGRect shakeFrameRight = CGRectMake(self.defaultFrame.origin.x + offset, self.defaultFrame.origin.y, self.defaultFrame.size.width, self.defaultFrame.size.height);
	CGRect shakeFrameLeft = CGRectMake(self.defaultFrame.origin.x - offset, self.defaultFrame.origin.y, self.defaultFrame.size.width, self.defaultFrame.size.height);

	viewToShake.frame = shakeFrameRight;

	[UIView animateKeyframesWithDuration:duration delay:0.0 options:UIViewKeyFrameAnimationOptionRepeat | UIViewAnimationOptionCurveEaseInOut animations:^{

	} completion:^(BOOL finished)completion {

	}];
}
The next parameter might look a little bit confusing. It expects a block, which is basically a block of code that we want to be executed by the animation method. The animations block syntax for this example is going to be:
^{ //Your code here }
Inside this block is where we’re going to be doing all our animating. We’re using the animateKeyFramesWithDuration animation method, which gives us the option of adding keyframes to the animation, which are frames within the animation that we specify.
The two frames we’re going to be specifying are the shakeFrameRight and shakeFrameLeft that we defined earlier. Basically, the animation is going to be moving between the two frames. To specify a keyframe, we add it into the animation block:
animations:^{
	[UIView addKeyframeWithRelativeStartTime:0.0 relativeDuration:0.5 animations:^{
		viewToShake.frame = shakeFrameLeft;
	}];
}
The first parameter:
addKeyframeWithRelativeStartTime:0.0
represents when during the total animation time you want this animation to start. 0.0 will mean this keyframe will start right after the animation method is called, while 0.5 means the keyframe will start halfway through the total animation time (duration = 0.06 seconds, so half of 0.06 seconds will be 0.03 seconds).
This next parameter specifies how long of the total animation time this keyframe will spend. A 0.5 relativeDuration means that half of the total animation time will be spent animating to this keyframe (0.03 seconds).
relativeDuration:0.5
This is getting a little crazy, but the next parameter takes another block. Inside this nested animation block is where we specify our first animation. By typing:
[UIView addKeyframeWithRelativeStartTime:0.0 relativeDuration:0.5 animations:^{
	viewToShake.frame = shakeFrameLeft;
}];
We’re telling UIView that we want to take the current frame of viewToShake (which has earlier been set to shakeFrameRight) and animate it to shakeFrameLeft.
Now we’re going to add our second keyframe, which is basically the same code as our first keyframe, except that we’re animating to the right this time.
animations:^{
	[UIView addKeyframeWithRelativeStartTime:0.0 relativeDuration:0.5 animations:^{
		viewToShake.frame = shakeFrameLeft;
	}];

	[UIView addKeyframeWithRelativeStartTime:0.5 relativeDuration:0.5 animations:^{
		viewToShake.frame = shakeFrameRight;
	}];
}
Note the different RelativeStartTime for the second keyframe. It’s going to be starting after the first keyframe ends.
Finally, we’re going to specify the repeat count of this overall animation, otherwise it’ll just repeat forever.
- (void)animateShake:(UIView *)viewToShake
{
	float offset = 5.0;
	float duration = 0.06;
	float repeatCount = 3.0;

	CGRect shakeFrameRight = CGRectMake(self.defaultFrame.origin.x + offset, self.defaultFrame.origin.y, self.defaultFrame.size.width, self.defaultFrame.size.height);
	CGRect shakeFrameLeft = CGRectMake(self.defaultFrame.origin.x - offset, self.defaultFrame.origin.y, self.defaultFrame.size.width, self.defaultFrame.size.height);

	viewToShake.frame = shakeFrameRight;

	[UIView animateKeyframesWithDuration:duration delay:0.0 options:UIViewKeyFrameAnimationOptionRepeat | UIViewAnimationOptionCurveEaseInOut animations:^{

		[UIView setAnimationRepeatCount:repeatCount];

		[UIView addKeyframeWithRelativeStartTime:0.0 relativeDuration:0.5 animations:^{
			viewToShake.frame = shakeFrameLeft;
		}];

		[UIView addKeyframeWithRelativeStartTime:0.5 relativeDuration:0.5 animations:^{
			viewToShake.frame = shakeFrameLeft;
		}];

	} completion:^(BOOL finished)completion {

	}];
}
We’re done with the animation block!
The final parameter in the addKeyFramesWithDuration method is another block. It asks what you want to do after the animation is complete. We’re going to reset our viewToShake frame back to the defaultFrame.
- (void)animateShake:(UIView *)viewToShake
{
	float offset = 5.0;
	float duration = 0.06;
	float repeatCount = 3.0;

	CGRect shakeFrameRight = CGRectMake(self.defaultFrame.origin.x + offset, self.defaultFrame.origin.y, self.defaultFrame.size.width, self.defaultFrame.size.height);
	CGRect shakeFrameLeft = CGRectMake(self.defaultFrame.origin.x - offset, self.defaultFrame.origin.y, self.defaultFrame.size.width, self.defaultFrame.size.height);

	viewToShake.frame = shakeFrameRight;

	[UIView animateKeyframesWithDuration:duration delay:0.0 options:UIViewKeyFrameAnimationOptionRepeat | UIViewAnimationOptionCurveEaseInOut animations:^{

		[UIView setAnimationRepeatCount:repeatCount];

		[UIView addKeyframeWithRelativeStartTime:0.0 relativeDuration:0.5 animations:^{
			viewToShake.frame = shakeFrameLeft;
		}];

		[UIView addKeyframeWithRelativeStartTime:0.5 relativeDuration:0.5 animations:^{
			viewToShake.frame = shakeFrameLeft;
		}];

	} completion:^(BOOL finished)completion {
		viewToShake.frame = self.defaultFrame;
	}];
}
You’re done! Call the shakeAnimate: method from anywhere else in your app and pass it a view that you want to shake. Just remember that the method depends on the instance variable self.defaultFrame so remember to change that if you want to mess around with your own views. Or redesign the method to your own needs. This was a quick and dirty demonstration.
If any of the code isn’t working for you, check with the first code snippet I posted that includes all the code I talked about.
You can mess around with the offset, the duration and the repeatCount to get an animation that you like. There are a lot of ways to achieve a shake animation, this was the way that ended up working for me.
Thanks for reading!