Creating an Interactive Sliding Menu
8/8/2015
I’ve always wanted to learn how to create a custom menus that slides in from the left or right hand side of the application.
I looked up some examples on github and a few tutorials, but none of them really had the requirements of what I was looking for.
Since I’m more experienced with views and animations now, I figured I would write my own sliding menu framework.
The first problem I tackled was finding a way to actually register a swipe that originated from the edge of the screen. Luckily, Apple has an API specifically for this gesture, called UIScreenEdgePanGestureRecognizer. This gesture recognizer detects panning that originates very close to the edge of the screen. This is probably what they use internally for gestures such as swiping up to open the Control Center.
My next requirement was to make the menu move with the movement of your gesture so that the menu would always be under your finger. This would require using the translation data found in the PanGesture super class. I created a method called handlePanGesture: that took the gesture and extracted the data on how far my finger has travelled.
(void)handleEdgePanGesture:(UIScreenEdgePanGestureRecognizer *)gesture
{
    if (gesture.state == UIGestureRecognizerStateChanged) {
        CGPoint translation = [gesture translationInView:gesture.view];

        CGFloat height = self.edgeMenu.view.frame.size.height;
        CGFloat width = self.edgeMenu.view.frame.size.width + translation.x;
        CGFloat x = self.edgeMenu.view.frame.origin.x;
        CGFloat y = self.edgeMenu.view.frame.origin.y;

        CGRect newFrame = CGRectMake(x, y, width, height);

        self.edgeMenu.view.frame = newFrame;

        [gesture setTranslation:CGPointZero inView:gesture.view];

        CGFloat alpha = (self.edgeMenu.view.frame.size.width / self.presentedFrame.size.width) * self.dimmingOverlayAlpha;
        self.dimmingOverlay.backgroundColor = [[UIColor blackColor] colorWithAlphaComponent:alpha];


    } else if (gesture.state == UIGestureRecognizerStateEnded) {

        CGFloat widthRemaining = fabs(self.presentedFrame.size.width - self.edgeMenu.view.frame.size.width);
        CGFloat duration = widthRemaining / self.presentedFrame.size.width;

        [self presentLeftEdgeMenuWithDuration:duration];

    }
}
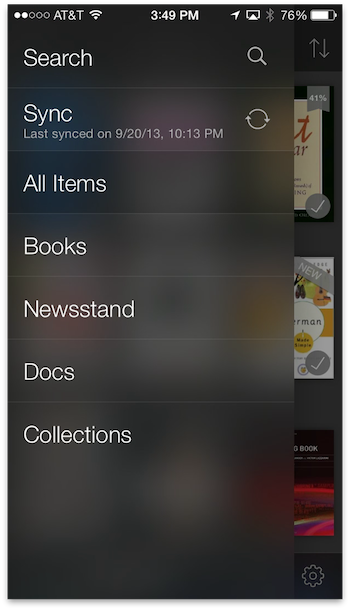
Inside this method I also added an invisible view that dims as the menu slides to the right. It uses the ratio of the current width of the menu to the full width of the menu to find how much to dim the view.
In addition, wherever the user stops pulling the menu from, it will animate to the full size of the side menu.
Here’s the completed sliding side menu using pan gesture recognizers with the dimming feature and animations:
I still have the problem of the table view controller within the menu adapting to changes from changing the size of the menu, which may or may not be an intended effect. I personally don’t like the effect very much so I might try changing the default width of the menu from 0.0f.